Project Breach: Demo Level Flow Design
This case comes from a paper design I made for the demo level early in my time on Project Breach. The embargo has expired, so I’m putting it here. Click the image to view it at full size.
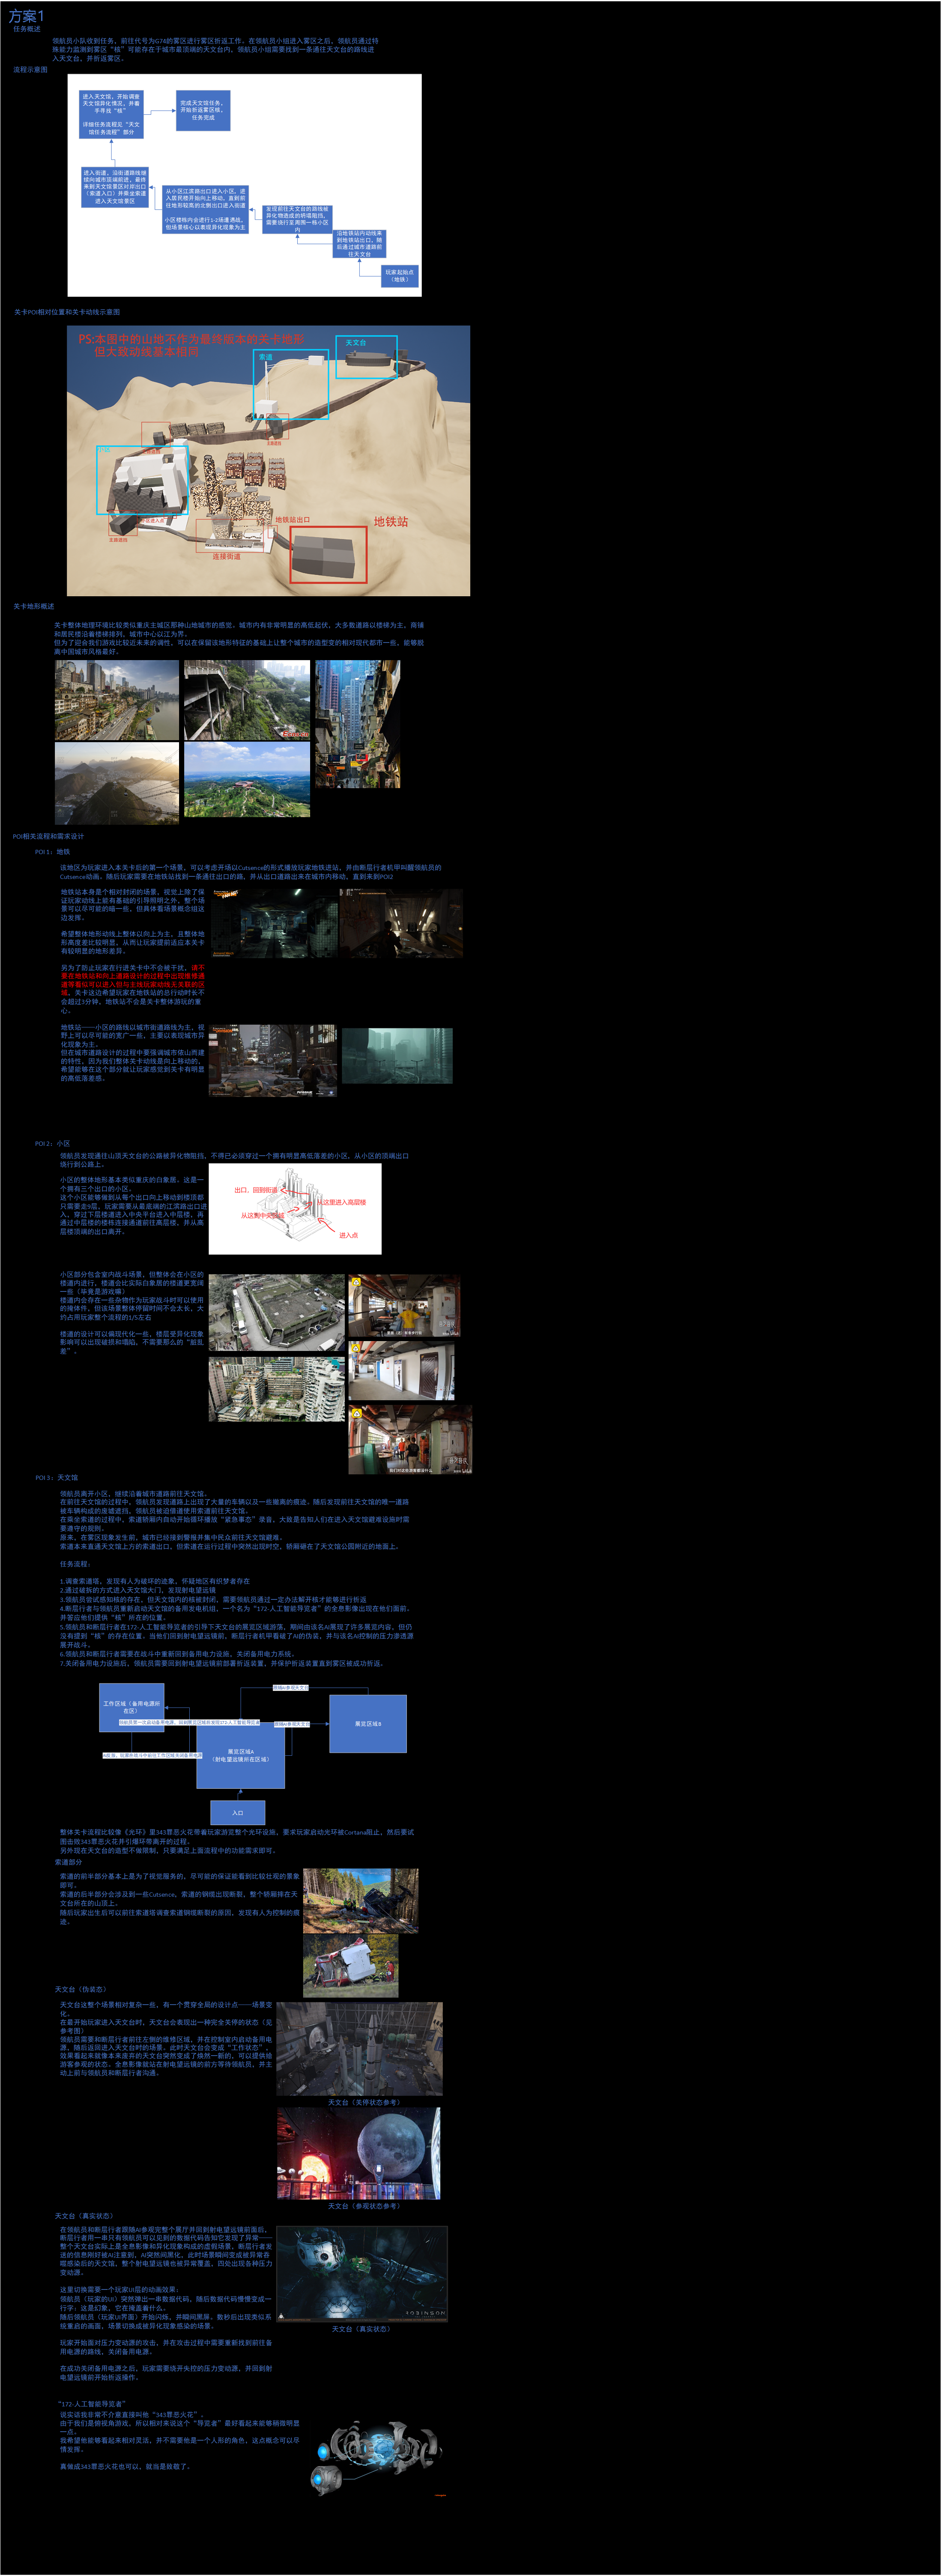
Design proposal 1
English rendering of the original design sheet. Project-specific names below are descriptive translations of the Chinese labels in that sheet.
Mission overview
A squad of Navigators (领航员) is assigned to Fog Zone G74 (雾区G74) to carry out a reversion (折返). Once inside, the Navigator uses a special ability to detect that the zone’s Core (核) may be inside the observatory at the highest point in the city. The squad must find a route to the observatory, enter it, and revert the Fog Zone.
Overall flow
- Player start: metro station. Follow the route through the station to its exit, then take the city streets toward the observatory.
- Blocked road. Discover that anomalous matter has formed a collapsed obstruction across the route. Detour through a nearby residential complex.
- Residential complex. Enter from the Riverside Road entrance and climb through the buildings. Leave through the highest northern exit onto the street leading to the observatory. There are one or two encounters in the stairwells, but the main emphasis is on showing the anomalous environment.
- Upper street and cable car. Continue along the street toward the top of the city. Reach the cable-car entrance on the opposite side of the observatory area, and ride across.
- Observatory. Investigate the anomaly affecting it while searching for the Core. The detailed sequence is described below.
- Reversion. Complete the observatory sequence, begin reverting the Fog Zone Core, and finish the mission.
POI positions and route
The blockout indicates the relative locations of the metro station, its exit, the connecting street, the residential complex and its entrance, the cable car, and the observatory. Obstructions on the main road force the detours.
Note: the mountainous terrain shown in the blockout is not the final level terrain. The broad route will remain much the same.
Terrain overview
The level’s geography should feel similar to a mountainous city such as central Chongqing. There are pronounced changes in elevation. Most routes consist of stairs, with shops and residential buildings arranged along them. A river divides the city center.
To fit the game’s near-future tone, we can preserve that geographical character while giving the city a more modern urban form. Ideally, it should move away from a specifically Chinese city aesthetic.
The reference images show dense hillside buildings, steep stairs and elevated structures, narrow urban streets, cable cars, and a hilltop destination.
POI 1: metro station
This is the first area the player enters. We could open with a cutscene bringing the player into the station, followed by the Riftwalker (断层行者) mech waking the Navigator. The player then finds a route to the station exit and continues through the city toward POI 2.
The station is relatively enclosed. Apart from the lighting needed to guide the player along the route, the scene can be fairly dark; the specific treatment is up to the environment concept team.
The route should predominantly climb, with clear changes in elevation, so the player gets used to the level’s vertical variation early.
To keep the player from getting distracted, do not include maintenance passages or other apparently accessible areas that have nothing to do with the main route when designing the station and its upward path. The player’s total time in the station should be no more than three minutes. This is not the level’s main gameplay area.
From the station to the residential complex
The connecting route primarily follows city streets. Sightlines can be relatively broad, with the main emphasis on showing how the city has been altered by the anomaly.
The streets should emphasize that the city is built along a hillside. The level’s overall route goes upward, and players should already be feeling those changes in height here.
POI 2: residential complex
The Navigator finds the road to the hilltop observatory blocked by anomalous matter. The only way around is through a residential complex with pronounced elevation changes, exiting at its highest point to rejoin the road.
The complex’s terrain is broadly modeled on Baixiangju (白象居) in Chongqing. It has three entrances/exits. From any entrance, reaching the top takes only nine floors of climbing.
The player enters at the lowest point, from Riverside Road. They pass through the lower building’s corridor onto a central platform, enter the middle building, then use its connections to reach the upper building and leave through the exit at the top.
The diagram marks the entry point → central area → upper building → exit back to the street.
Interior encounters
The residential section includes indoor combat, mostly in the complex’s corridors and stairwells. These should be wider than the real Baixiangju passages. It is a game, after all.
Some miscellaneous objects provide cover, but the player should not stay here too long. The area takes up roughly one fifth of the complete sequence.
The corridors can look a little more modern. The anomaly may have damaged or collapsed parts of the buildings, but they do not need to be quite so dirty, cluttered, and run-down.
POI 3: observatory
After leaving the residential complex, the Navigator continues toward the observatory along the city streets.
On the way, they find many damaged vehicles and signs of an evacuation. Eventually, wrecked vehicles block the only road onward, forcing them to take the cable car.
During the ride, an emergency recording automatically begins looping inside the cabin. It explains the rules civilians must follow while sheltering at the observatory. Before the Fog Zone phenomenon occurred, the city had received a warning and gathered civilians there.
The cable car should reach a station above the observatory. Instead, it suffers an accident mid-journey, and the cabin crashes onto the ground near the observatory park.
Quest sequence
- Investigate the cable-car tower. Signs of deliberate damage suggest that a Dreamweaver (织梦者) may be present in the area.
- Break into the observatory’s main entrance and discover a radio telescope.
- The Navigator senses the Core, but it is sealed inside the observatory. A way must be found to open it before reversion can begin.
- The Riftwalker and Navigator restart the backup generator. A hologram called 172 — AI Guide (172-人工智能导览者) appears and promises to show them where the Core is.
- The Navigator and Riftwalker follow 172 through the exhibition areas. The AI presents plenty of exhibits, but never reveals the Core’s location. When they return to the radio telescope, the Riftwalker mech sees through its disguise. Combat begins against the pressure anomalies (压力变动源) controlled by the AI.
- While fighting, the Navigator and Riftwalker must return to the backup-power facilities and shut the system down.
- Once the backup power is off, the Navigator returns to the radio telescope, deploys the reversion device, and protects it until the Fog Zone is successfully reverted.
Observatory layout and loop
The entrance leads into Exhibition Area A, which contains the radio telescope. A service area to its left contains the backup power supply. Exhibition Area B lies to the right.
- First visit: enter Area A, go to the service area to restore backup power, then return to Area A and encounter 172.
- Guided tour: follow the AI through Areas A and B, looping back to the telescope.
- Betrayal and combat: fight back toward the service area to turn off the backup power, then return to the telescope for reversion.
The broad sequence resembles Halo: 343 Guilty Spark takes the player on a tour of the installation, asks them to activate Halo, and is stopped by Cortana; the player then tries to defeat him and blow up the ring to escape.
At this stage, the observatory’s form is unrestricted, provided it meets the functional needs of that sequence.
Cable car
The first half of the cable-car ride primarily serves the visuals. Give the player as spectacular a view as possible.
The second half includes cutscenes: the cable snaps, and the cabin crashes onto the hilltop where the observatory stands.
After surviving, the player can investigate the cable tower to find out why the cable broke, discovering signs of deliberate interference.
Observatory: the disguise
The observatory is relatively complex, with one design idea running through the whole area: the scene changes state.
When the player first arrives, it appears completely shut down. The Navigator and Riftwalker must go to the maintenance area on the left and activate the backup power in the control room.
Returning to the observatory, they find it in its working state. What looked like an abandoned facility suddenly appears pristine and open to visitors. A hologram waits in front of the radio telescope, then approaches and speaks to the Navigator and Riftwalker.
The reference images contrast the shut-down state with a functioning visitor exhibition.
Observatory: the real state
After the tour, the Navigator and Riftwalker return to the radio telescope. Through a string of data visible only to the Navigator, the Riftwalker reports that it has detected an anomaly: the entire observatory is a false environment made from holograms and anomalous phenomena.
The AI notices the message and abruptly turns hostile. The scene instantly changes into an observatory consumed and infected by the anomaly. The radio telescope is covered by it, and pressure anomalies appear throughout the space.
Player UI transition
The Navigator’s UI suddenly displays a string of data. It slowly resolves into a sentence:
This is an illusion. It’s hiding something.
The player view then flickers and briefly goes black. A few seconds later, something like a system-reboot screen appears, and the scene changes to its infected state.
Combat and reversion
Under attack from the pressure anomalies, the player must find their way back to the backup power and shut it down.
Once it is off, they must bypass the now-uncontrolled anomalies and return to the radio telescope to begin reversion.
172 — AI Guide
Honestly, I wouldn’t mind just calling it “343 Guilty Spark.”
Since this is a game viewed from above, the guide should be visually noticeable. I’d like it to seem relatively nimble. It doesn’t need to be humanoid, so the concept team has plenty of room to explore.
We could also just make it look like 343 Guilty Spark. Call it a homage.
Looking back
Looking at this case now, I can see a few problems with it:
- It feels more like a showy demo level than a carefully designed quest sequence. The requirements mainly served the art presentation. There wasn’t much deliberate design of events.
- The overall pacing drew on two references: The Division‘s raids and Halo 3. The 3Cs—character, camera, and controls—drew on Mutant Year Zero: Road to Eden. That created a few contradictions in how the sequence was presented.
- Before the observatory, the pacing is very much The Division: arrive at a POI, fight an encounter, pass through it, fight another encounter or two on the way, then reach the next POI.
- Although the 3C prototyping leaned toward Mutant Year Zero, the sequence itself was conceived more like a top-down shooter, or even a third-person shooter.
- The observatory section puts the brakes on rather deliberately—the Guilty Spark guided tour. Without it, though, the whole instance would feel very much like a raid. A bit of that Destiny 2 flavor.